how'd you all do this week?? did you stay away from green square?? I am proud to report that I did {for the most part.} yes, one time this week, I did shoot in green square, at a wedding reception. {hey, it was candlelit and I could not figure it out, and I needed some sweet shots of my daughter bustin' a move}
ok, if your just stopping by for the first time this week, you can still join in on the fun, check out lesson 1 here and feel free to catch up or follow along at your own pace!!
so, here is the content for lesson 2. a huge thanks to two peas in a bucket for this awesome introductory photog class... I am also super excited to say that today, my lovely friend, molly, from willow brandt photography, is here to help us out with today's lesson.
meet.molly.as.she.tells.all...
tell us a little about yourself??
let's see. i'm a mom to two littles and one on the way. met my husband on a blind date, we've been married 7 years. i moonlight as a labor and delivery nurse with miss elizabeth. when my first little was born i took lots of awful pictures, truly awful. shaky, blurry and the like. when he was almost a year old i decided i needed some photo album worthy pics and bought my first slr......and that's where my story starts.
what inspired you to learn about photography and what keeps you inspired??
hands down, i was inspired by my first little to want to learn about photography. from there i watched others, did lots of on-line research and took hundreds more blurry and shaky pics to get to what i know now. keeping myself inspired comes easy with my own littles, lots of friends with littles, and all that creativity on the web doesn't hurt either. what i definitely know is that photography is something i'll never stop learning about and the opportunity for growth is endless.
so...tell me, why should I shoot in {M} instead of {green square}??
shooting in {M} lets you get the most out of your camera. it allows you to tell it what to do, down to the finest details that help get those great shots. you know, the ones with the blurry background, the crisp focal point and the right exposure. your camera lets you set all of these things when you use the functions that are available to you while shooting in {M}. when you use the auto mode where your camera tells you what the picture will look like, you have no control over how that image will turn out. it might be blurry, it might be too dark or too bright, or worse yet, you'll miss a great shot waiting for that flash to warm up. it takes a little bit of work, but after you get the basics down it's well worth every minute spent, promise!
I will admit, I was a lot intimidated by this lesson. but, after practicing for a few days, I feel a little bit better and I bet by next week will feel tons better {I hope}
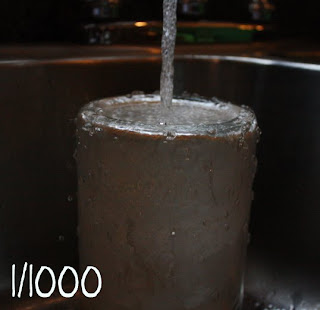
I did the kitchen sink test, just like the lesson instructed me too. here's my take.
ok, so I did the pictures, now what does that mean for me??
when you look at the first picture in comparison to the last picture you can see a huge difference. the faster your shutter speed, the faster the image is taken. in the first picture, there's not much to look at. the water running off the canister is hard to see. when you look at the water running off the canister in the last picture, you can see the bubbles coming from the faucet and the bubbles on the side. much more detail. if you're feeling brave, when you're done with the lesson all together, go back and take the sink challenge again. try once on auto and once controlling all you know in {M} mode and see what you think. you'll be impressed, i'm sure!!
for the second part of the lesson, I shot in M {I feel like such a big girl, yay} and here are some of the shots I took. {my Lilly's really bloomed over the last week. aren't they prettyful?}
so, how'd I do??
you did great! the colors are bright and vibrant, and the detail is perfect.
any advice for those of us that just bought our very first SLR camera and are trying to learn to take better photos??
the best advice that i can give to anyone is to practice and play around. take a day and photograph everything. keep it in manual, and don't worry about what the end result will be. it wasn't very long ago i read through these tutorials, took lots of not so great pictures, and in that mix found a few good ones that i got excited about....and the rest is history! just play and learn. take pics of your littles, take pics of your surroundings, take pics of still things, moving things and silly stuff in-between. have lots of fun, be patient with yourself and just enjoy it. somewhere in the midst of all this, you'll have captured the small things in life that matter in the end.
alrighty, thanks to molly for guest blogging today, and good luck shooting in M this week...
we can do it! yay!!
oh, and one more tidbit. I have been eyeing this oven mitt tutorial for a while now, and finally had a reason to use it. who wouldn't love this wedding gift? what, with the pioneer woman's cookbook, some cutesie kitchen towels that I made up and coordinating oven mitt. LOVE.. getting married soon?? you may be getting this as your gift!!
have a lovely week friends!!!


I love these tutorials! They give me hope for what my photography could become!
ReplyDelete